


If you’re looking for a quick and easy way to fill up a Disney Christmas tree, I’ve got the perfect tutorial for you!
In this post, I’ll show you how to make glitter ornaments in just a few easy steps. Plus, I’ve included a list of 100 Disney inspired ideas sorted by glitter color, so you can get crafting quickly.
Materials for DIY glitter ornaments

Creating beautiful glitter ornaments is super easy and doesn’t require a lot of ingredients.
It can also be done on a budget if you plan your project to use as few colors as possible and buy materials during a sale.
For example, I always find that craft stores put the clear ornaments on sale during the week of Thanksgiving or at least starting on Black Friday.
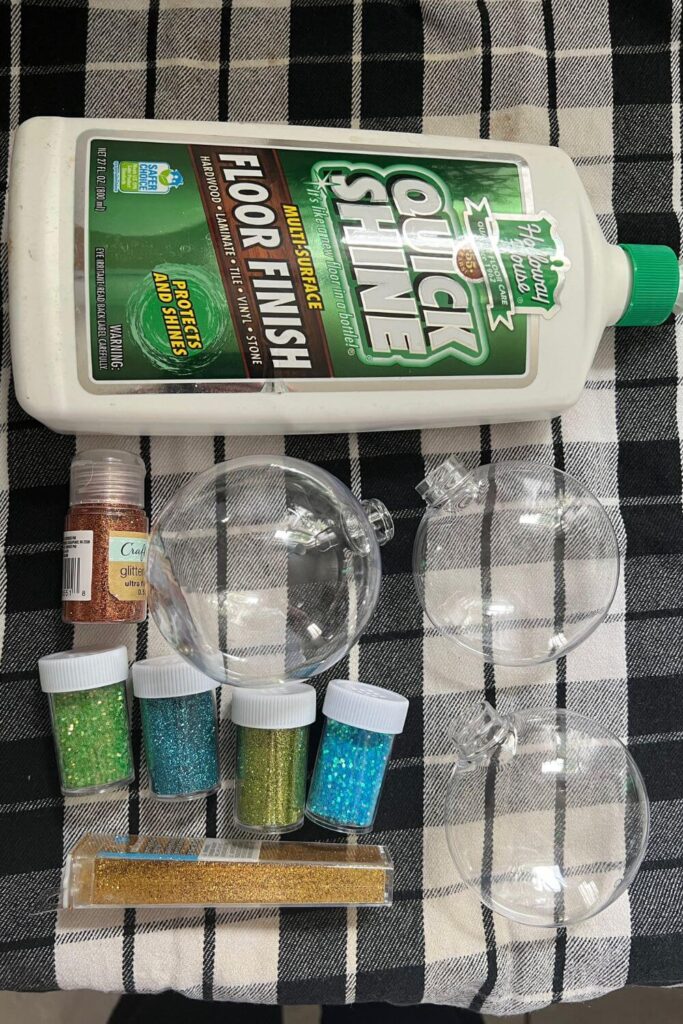
- Clear ornaments – Any shape or size will do. I prefer plastic over glass simply for durability, especially if there are kids or pets in the house!
- Multi-surface floor finish or polycrylic solution – I used Holloway House Quick Shine, but Mop & Glo is another brand that works well. I prefer to use floor finish versus polycrylic solution because the floor finish bottles have convenient spout that fits perfectly in the opening of the ornaments.
- Extra fine glitter – Avoid medium, craft cut, or chunky glitter, as it does not adhere as well and it’s more prone to flaking off over time.
- Rubbing alcohol
- Embellishments – Use ribbons, felt, sheet foam, pom poms, stickers, pipe cleaners, rhinestones, acrylic paint and so on, to decorate the ornaments.
If you make a purchase from the affiliate links on this page, I will earn a commission at no extra cost to you.

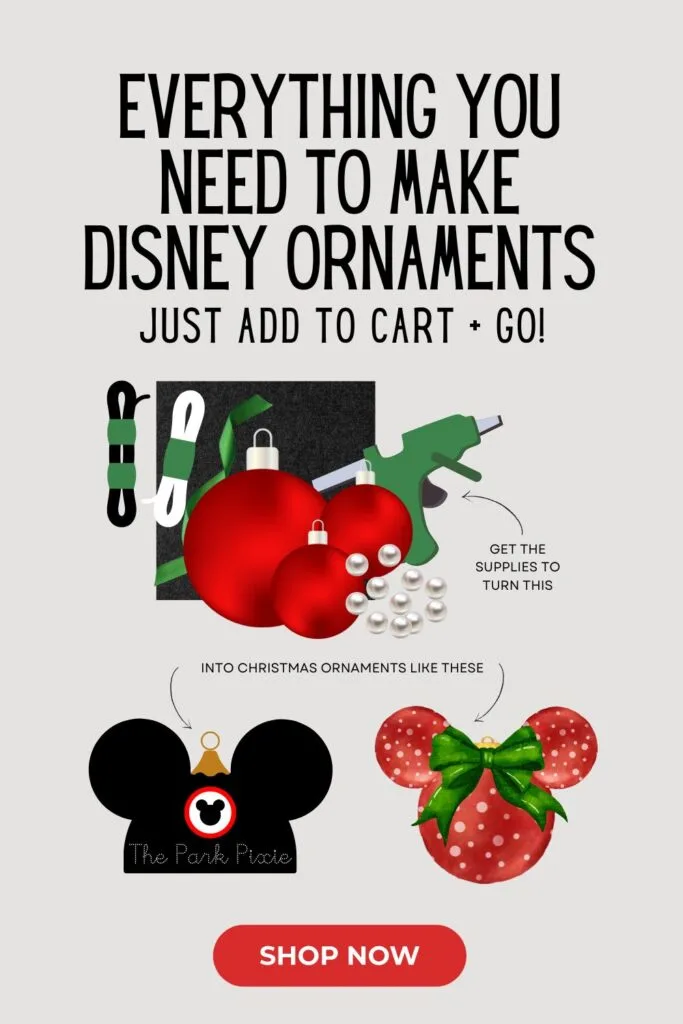
Find everything you need to make DIY Disney Christmas ornaments right on Amazon. Just add to cart and go!
No need to head out to the busy stores during the holiday season when you can buy everything you need online to make my DIY Christmas ornament tutorials, plus a few extra Christmas-y lists to help you out with your holiday shopping needs.
- DIY Disney Christmas Supplies
- Disney Christmas Lawn Decorations
- Disney Christmas Ornaments (in case you don’t want to DIY)
How to make glitter ornaments
OK, now let’s get into how to actually make the ornaments!
Step 1: Plan out your designs

Before you buy your materials, I recommend planning out what you want to do with the ornaments after you make them.
If you’re just going to make the glitter ornaments and leave them as-is, then obviously you can skip this step. But given that this is a Disney blog, I recommend decorating them to honor your favorite characters, movies, books, park snacks, etc.
By carefully planning out your ornaments, you’ll know how many clear ornaments you need, which shapes to use (round, disc, oval, etc), which color glitters to use, and what embellishments you’ll need to buy.
There are so many different things you can use to decorate the ornaments, so what you need as far as embellishments go depends on what or who you want to make.
Some ideas for embellishments include: acrylic paint, felt, foam sheets, ribbon, pipe cleaners, flatback, rhinestones, stickers, cardstock, scrapbook paper, stickers, Cricut vinyl, and faux flowers.
At the end of the day – save yourself multiple trips to the store or too many online orders and plan ahead!
Step 2: Clean the ornaments
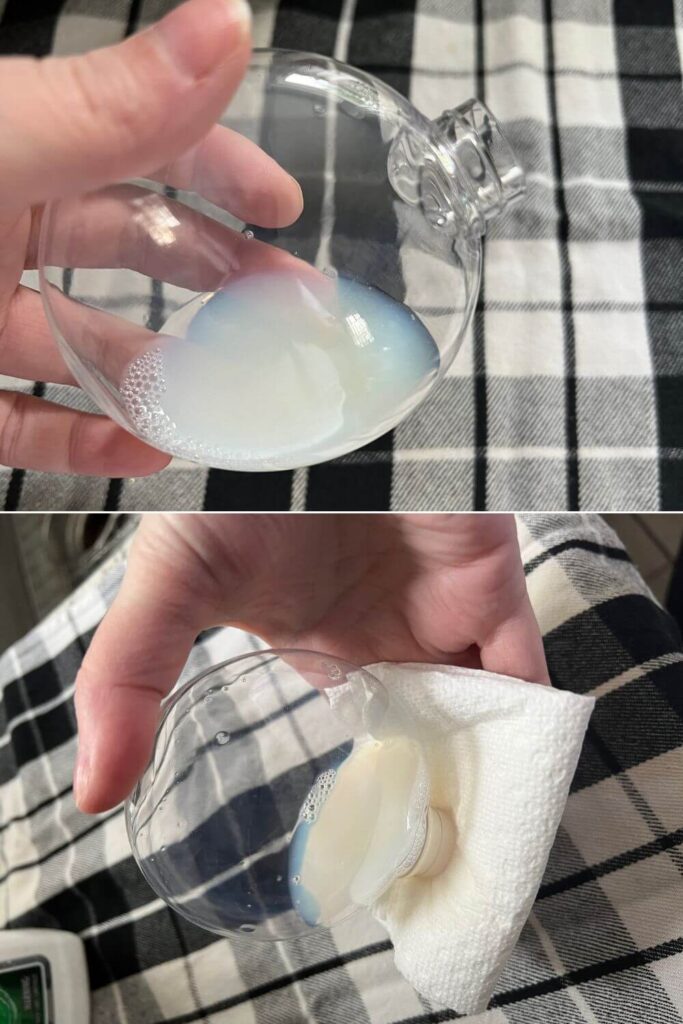
Pour a small amount of rubbing alcohol into the ornament and swirl it around to coat the inside. Dump the excess.
This will prep the surface and help ensure the glitter sticks.
Then, set upside down in a cup and let it dry. Easy peasy.
Step 3: Coat the inside with mop & glow or polycrylic solution

Once the ornaments are dry, it’s time to get started making them!
Place the ornament on top of the open spout of the floor finish. Flip the ornament and bottle upside down and squeeze a little bit of the floor finish into the ornament.
Slowly swirl the solution around the ornament to coat the inside. Don’t shake the solution inside the ornament or it will cause bubbles that are a pain to get rid of.
Put a piece of paper towel or cardboard over the opening of the ornament to get the last bit of the ornament without spilling solution everywhere.
If there are any bubbles inside, slowly flip the ornament upside down and poke some paper towel inside and tilt the ornament so the bubbles slide toward the paper towel. This is usually enough to get any remaining bubbles out.
However, if you are having a hard time getting them out, pour some more solution inside. Slowly swirl the solution toward the bubbles to pick it up and either pour it out or absorb with paper towel.
Step 4: Add some glitter

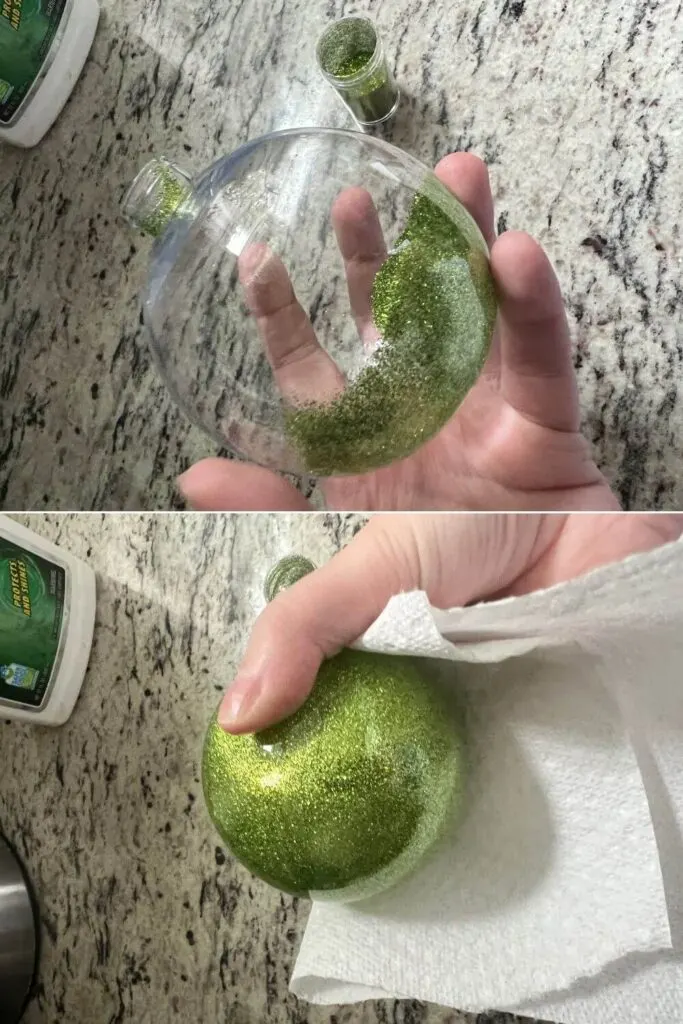
Once you’ve gotten the inside of the ornament good and coated and all bubbles removed, it’s time to add some glitter.
Pour a little bit of glitter into the ornament. You can use a funnel to help prevent glitter from spilling everywhere, but it’s not required.
Swirl the glitter around to coat the inside. If need be, cover the opening of the ornament and shake it to ensure the entire inside gets coated.
You may need to add more glitter. I prefer to add a little at a time to avoid wasting any, especially if I know I’ll be using that same color glitter for multiple ornaments.
Once the inside is fully coated, turn the ornament upside down and place it in a cup to let dry.
The ornament should be dry enough after about 15-20 minutes, at which point you can pop the hanger back in.
That said, I usually do a batch of ornaments in one go and let them sit overnight before I start decorating them. It’s not necessary to let them sit this long; it just feels more productive to complete the steps in batches.
In fact, this year, I did a batch of glitter and paint ornaments the weekend after Thanksgiving at my mom’s house and won’t be decorating them ’til I’m back in mid December for Christmas!
Step 5: Decorate the ornaments
From here, the sky’s the limit on what you can do with the glitter ornaments.
As I mentioned earlier in this post, if you plan out what you want to make, this will help you figure out what to buy before you start creating and help lessen how much you spend!
To help you out, keep reading for a handful of tips to make your project a success, plus 100 ideas for Disney-inspired DIY glitter ornaments!
Tips for decorating DIY glitter ornaments

Use Cricut vinyl: If you don’t want to paint or aren’t confident in your artistic skills, consider using Cricut vinyl stickers. We did this with half of our ornaments.
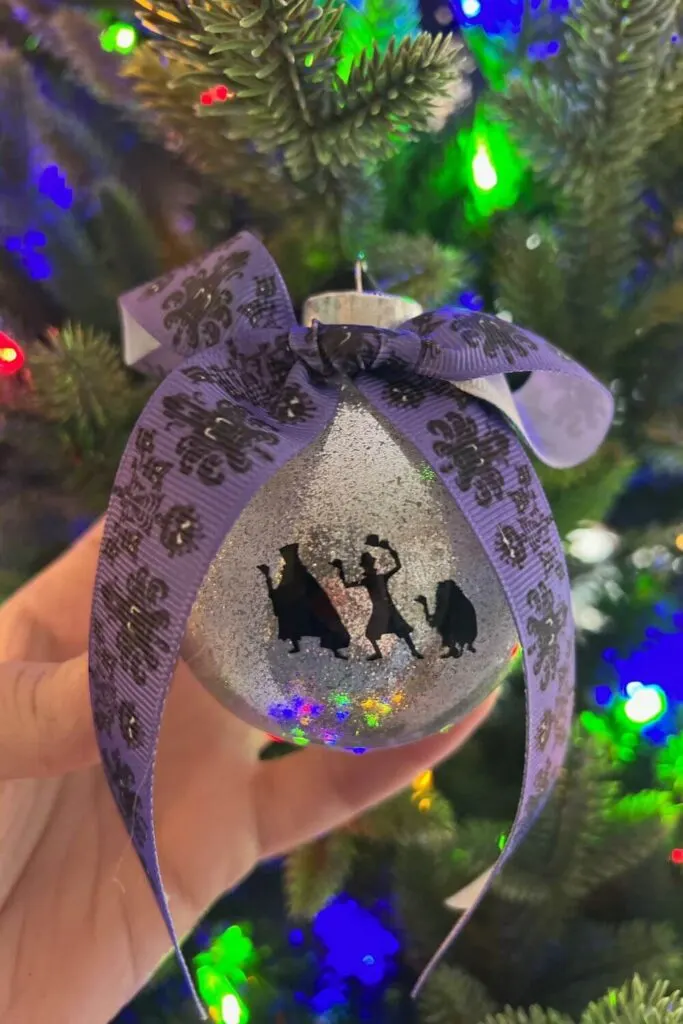
To add more detail, we used ribbon or other embellishments in addition to the sticker, like the Haunted Mansion ornament pictured above.
Clean the outside: Just like we cleaned the inside of the ornament with rubbing alcohol, you’ll want to do the same with the outside before painting or adhering anything to it.
This just helps ensure any residues or fingerprints that can hinder your artwork are removed!
Choose the right adhesives: Hot glue is cheap and easy, but not always the easiest to use, nor delicate enough for certain embellishments.
E-5000 and Ailene’s tacky glue are both decent adhesives to have on hand if you need to glue any embellishments.
Choose the right paint: If you plan to paint designs on your ornaments, double check to ensure it will stick to plastic. Some brands, especially washable ones, don’t adhere well enough to plastic and will just chip off.
Use paint pens: Consider using paint pens for easier control when drawing. Look for pens with a fine tip to help with intricate lines.
Use painter’s tape: Use painter’s tape to help create clean, straight lines when painting large portions of the ornament. You may need to tear it up into smaller pieces to ensure it lays flat on the ornament.
Let it dry: If you paint the surface of the ornament, let it dry for at least 24 hours before adding additional paint, embellishments, or sealer.
Seal the design: Use Mod Podge sealer (spray or paint-on) to seal and protect the design.
100 ideas for DIY Disney glitter ornaments
Need some Disney inspired ideas for your Christmas tree ornaments? In honor of Disney’s 100th birthday, check out the list below, sorted by glitter color, for 100 free ideas.
Black glitter
- Anna: Use fuchsia, purple, gold, and green paint to draw the floral design from Anna’s classic dress on the ornament.
- Binx: Use yellow and black paint for his eyes and black felt for his ears.
- Black Widow: Use red paint to add her hourglass symbol.
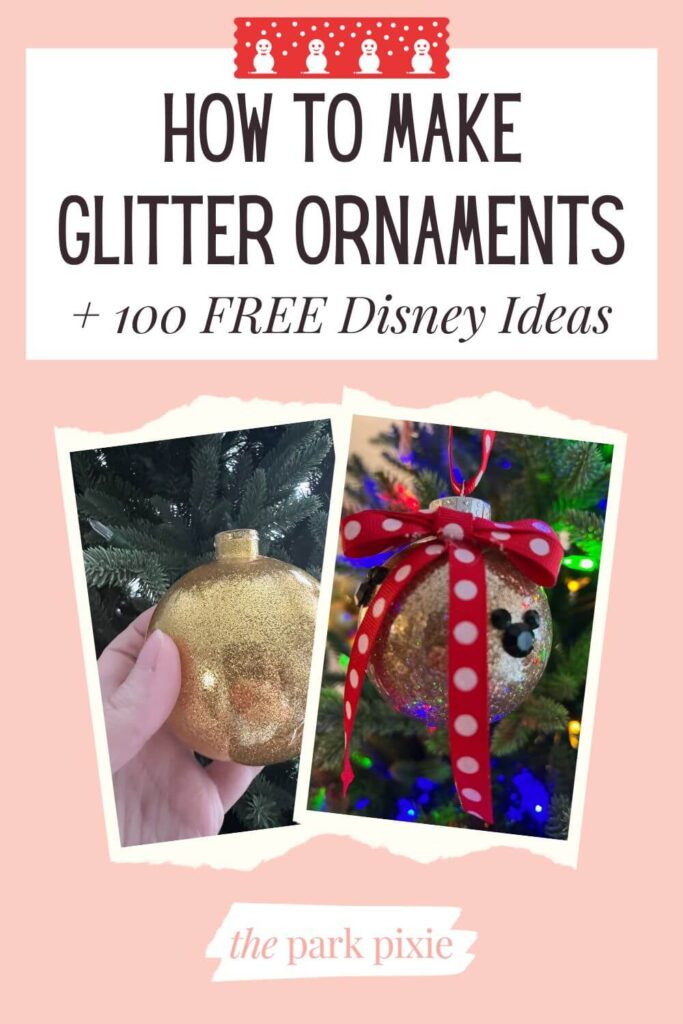
- Mickey and Minnie Mouse: Hot glue 2 large-ish pom poms to the ornament to create Mickey’s ears. For Minnie, add a bow made from red and white polka dot ribbon.
- Darth Vader: Use a silver paint pen to draw an outline of Darth Vader’s face on the ornament. Alternatively, you can create or purchase a silver Cricut sticker of his silhouette and place on the outside.
- Goofy: Paint the top third lime green and the bottom third orange. Use felt to add floppy ears.
- Jafar’s Hat: Use gold and fucshia or dark red paint to add the striped part of his hat. Add a red or dark pink jewel to the center, making sure to match the jewel to the color paint used.
- Maleficent dragon: Use yellow and neon green paint to draw in the facial features. Then use felt to add horns. Bonus points if you add purple lines on the horns using puff paint or stitch them in with embroidery thread. Another extra touch would be using a purple ribbon for the hanger.
- Star Wars logo: Use a disc-style ornament for a flatter surface. Draw the logo on with a yellow paint marker or add a Cricut vinyl sticker. If you don’t have a Cricut, hit up Etsy and support a small business!
Blue glitter
- Beauty & the Beast rose stained glass: Use pink or red acrylic paint for the rose bud and green for the stem. Then use a black or gold paint pen to draw the stained glass lines. You may want to practice drawing this one out first, as it can be tricky even for talented artists!
- Captain America shield: Use red and white (or silver) paint to draw in the design of the shield.
- Dory: Use a disc-style clear ornament. Paint on her markings with black acrylic paint. Add fins and a tail made from felt. For her eyes, either paint them on using white and black paint or glue on googly eyes!
- Kevin from Up: Use black, white, yellow, and orange paint to draw in Kevin’s face. Add feathers at the top or use pipe cleaners if you can’t find small feathers like Kevin has.
- Monsters University logo: Use black and white paint to add the logo, which will let the blue part of the logo be all glittery!
- Stitch: Paint on his face using lighter blue, white and black acrylic paint. Glue on ears made from felt.
Brown glitter
- Chewbacca: Add a black or brown ribbon with white or silver dashes diagonally, like Chewie’s sash.
- Chip & Dale: Using tan, white, black, and red paint, draw in the facial features. Remember Chip has a black nose like a chocolate chip and Dale has a red nose. Use matching brown and tan felt to add ears.
- Cogsworth: Use black, white, gold, and tan paint to add his facial features. Use brown and tan felt to add the ornate “crown” to the top of the ornament.
- Gus Gus: Wrap green felt or ribbon around the neck of the ornament. Paint his face using black, white, and dark red or rusty brown, and yellow around the bottom half or third for his shirt. Use pink and brown felt for ears.
- Jacques: Wrap dark red felt or ribbon around the neck of the ornament. Paint his face using black, white, and dark red or rusty brown. Use dark red and orange paint on the bottom half or third for his jacket and shirt. Use pink and brown felt for ears.
- Kakamora: Use tan paint to make a shape for the face, then use white, black and red to add the eyes and “war paint.” If you want to go up a step from basic, use felt, faux leaves, or faux flowers to add hats or horns, like in Moana.
Dark green glitter
- Loki: Use yellow felt to add horns. You could also use lime green glitter instead of dark green.
- Merida: Use gold paint to draw on the design from one of her dresses. Add an orange or green plaid bow and use orange or green ribbon (opposite of what you use for the bow) to hang the ornament.
Lime green glitter

- Grogu: Use black paint to add his facial features. Then use matching lime green and pink felt for his ears and tan felt for the jacket.
- Jiminy Cricket: Use black and white paint to add his facial features and blue felt for a top hat.
- Anna: Use olive and dark green paint to create vertical stripes, like Anna’s green Coronation Day dress. Then use pink, red, and dark green to add the floral design on the olive stripes. Feel free to do one large stripe down the middle instead of lots of thin ones.
- Disgust from Inside Out: Use dark green, black, and white paint to add her face. Alternatively you can use dark green felt or yarn for her hair instead of paint.
- Heimlich: Use dark green, black, white, and red to drawn on his face and red pipe cleaners for his antennae.
- Kermit the Frog: Use black, white, red, and fuchsia paint to draw in his face.
- Mike Wazowski: Draw on his cyclops eye and a mouth with acrylic paint. You could also add arms and legs made from pipe cleaners.
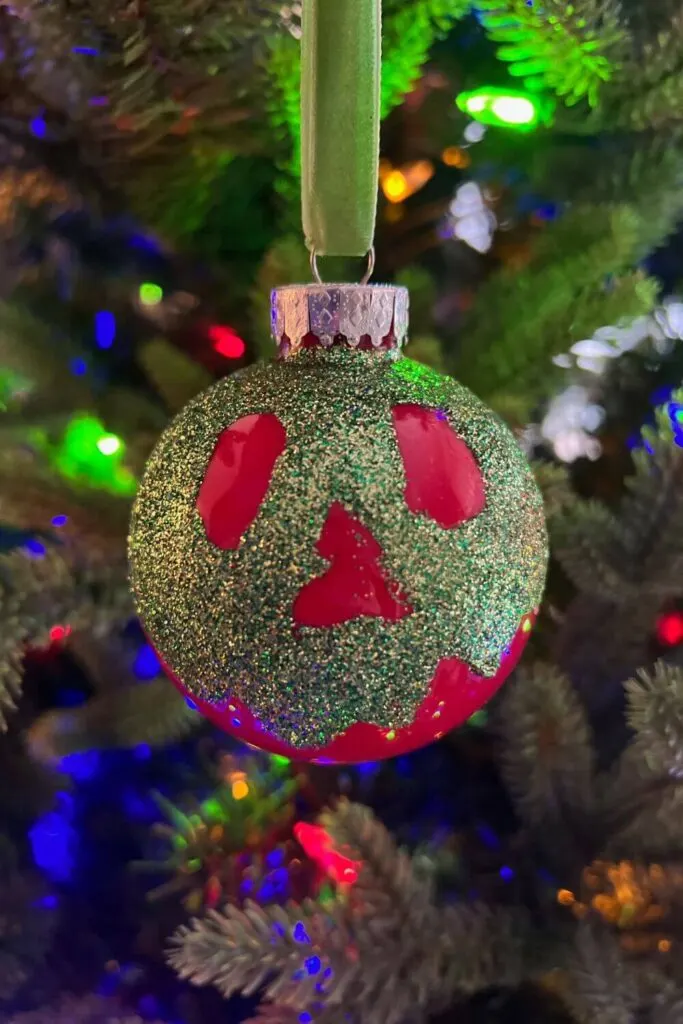
- Oogie Boogie: Use a disc-style ornament. Draw on his creepy face using black acrylic paint.
- Oozma Kappa: Use yellow paint to add the OK logo from one of the Monsters University fraternities.
- Peter Pan: Use red felt to add a feather one side, like Peter does with his cap.
- Tiana: Add a faux lily flower to the top. Use gold ornamental stickers or puff paint to add accents, Another option is adding a few flatback pearls.
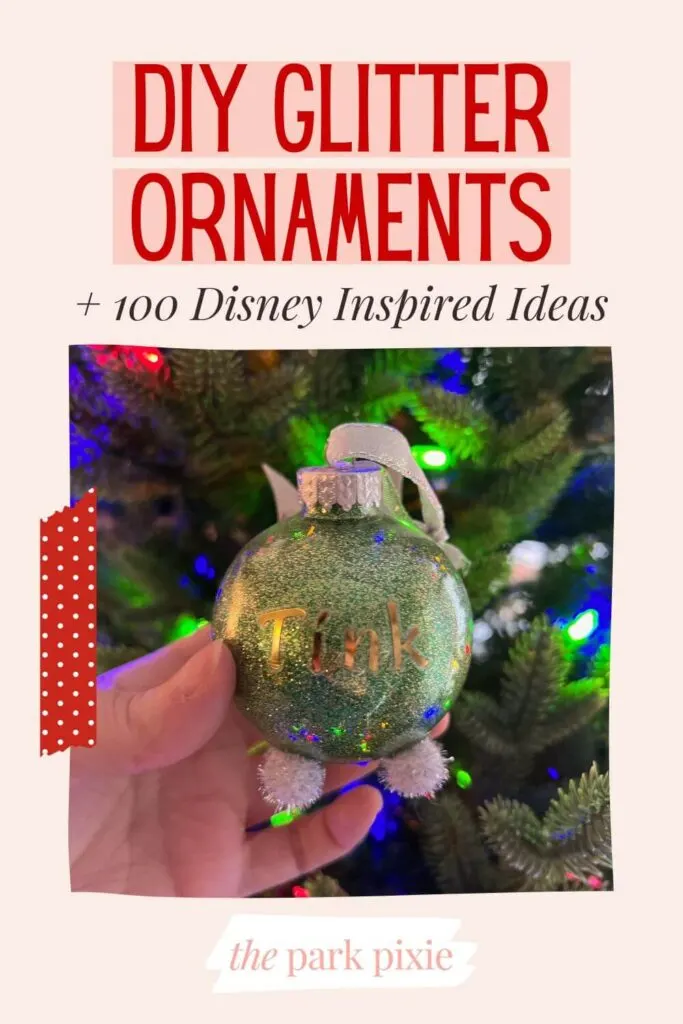
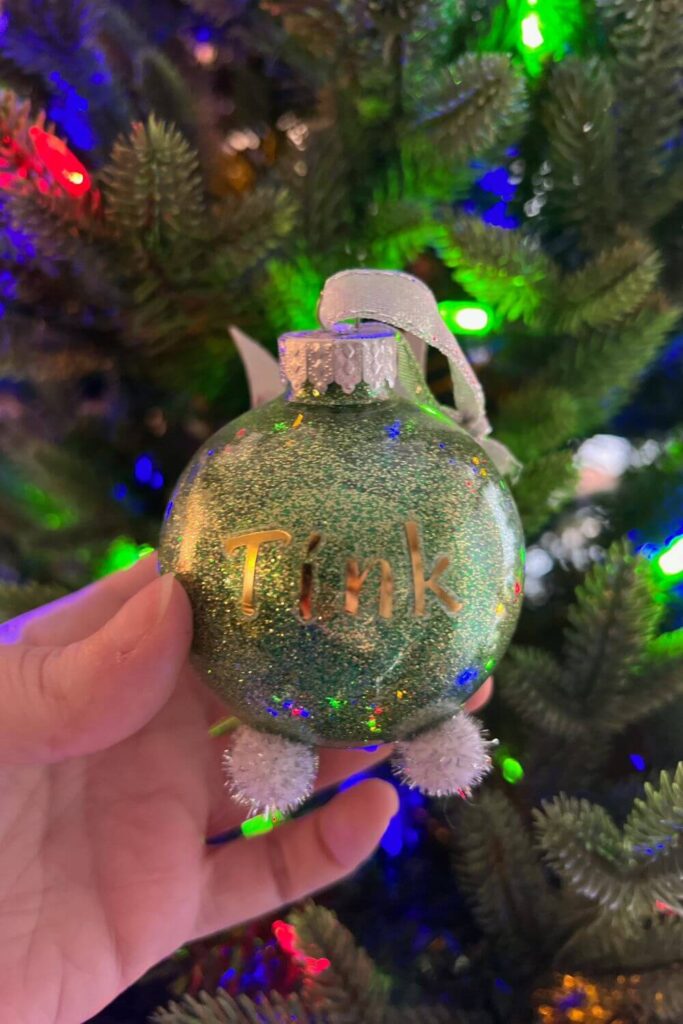
- Tinkerbell: Add tiny silver pom poms to the bottom for feet. Add silver wings to the back made from silver or holographic cardstock or glittery felt. You could also add a yellow or gold ribbon around the neck of the ornament to emulate her top knot.
- Toy Story aliens: Draw on three eyes with white and black acrylic paint. You could also add antennae made from lime green pipe cleaners, plus you could paint on their blue suit on half of the ornament. Use painter’s tape to create a straight line.
- Yoda: Use black and a darker lime or olive to draw in his facial features and a matching olive or dark lime felt for his ears. Use a torn up cotton ball or faux cotton snow to add a wisp of white hair to the top.
Fuchsia glitter

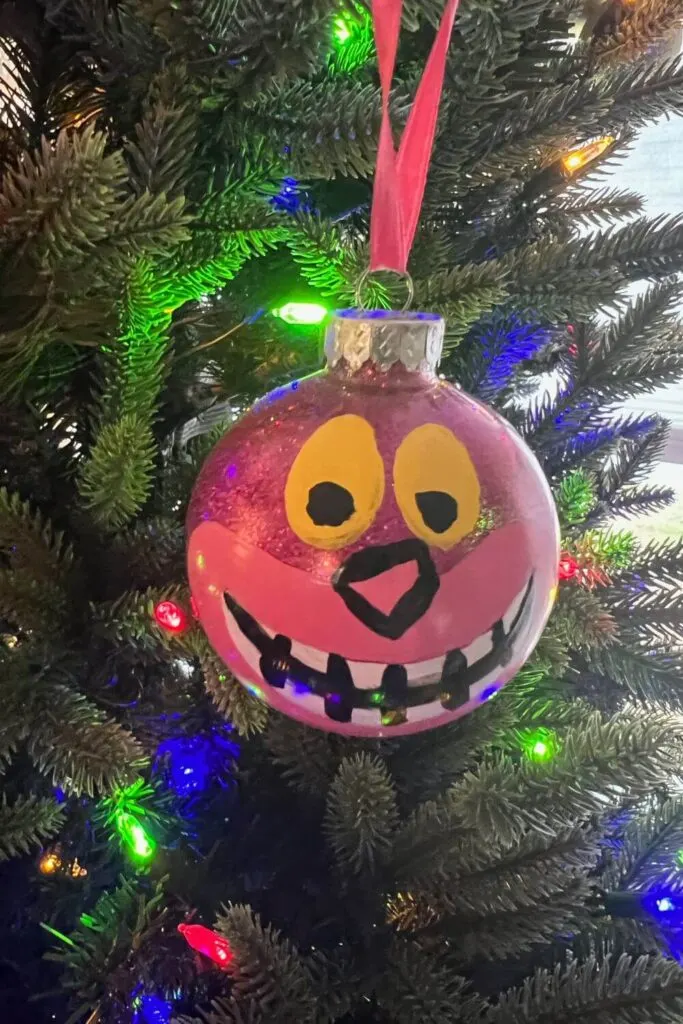
- Cheshire Cat: Use yellow, pink, white, and black paint to add his eerie face and smile. You could also use pink or fuschia felt to add ears.
- Kuzco’s poison: Use white and black paint to add either the folded-over “poison” label or the unfolded extract of llama label. If you really want to go all-out, paint the full label on a piece of white fabric, then fold down the top and paint the half label. Use a tiny strip of velcro at the bottom of the half label and on the ornament, so you can open and close it!
- Python Nu Kappa: Use light pink paint to add the PNK logo from one of the Monsters University sororities.
Gold glitter
- Belle: Use yellow or gold ribbon in a swooping pattern around the ornament. Add a small pink or red rose at the peak of each swoop.
- Encanto candle: Use black or brown paint to draw on the butterfly design.
- King Richard: Make a miniature crown out of sheet foam or felt. Adorn it with colorful acrylic crystals or flatback rhinestones. Make sure it can sit a bit low on the ornament, as if it is sitting over his eyes because it’s too big. Use black paint to add his nose to further drive home that the crown is covering his eyes.
- Pooh Hunny Pot: Use yellow paint to add a dripping pattern on the top quarter of the ornament, like honey. Use a black paint marker to write “hunny” in the middle. If you can find a tiny bumble bee embellishment, glue one on! You could also use a tan or brown colored glitter instead of gold for this one. I’ve sometimes even seen blue hunny pots!
- Powerline logo: Use orange and black paint to add the Powerline logo from Max’s costume. Alternatively, you could use yellow glitter instead of gold, but I like the idea of a little extra shimmer from the gold!
- Simba: Use black, white, brown, off white, and pink paint for the face. Use gold or tan felt for the ears.
- Snow White: Paint the top half of the ornament royal blue. Add a red ribbon.
- Star from Wish: Use light and dark yellow paint for the heart-shaped face. Add gold pom poms for the arms and legs.
Green glitter
- Ariel: Add purple seashells or accents to mimic her bikini top. You could also add a splash of red, like a red ribbon around the neck of the ornament, to represent her famous red hair.
- Pete the Dragon: Use black and white paint for the face. Add a fluffy violet material, such as a marabou boa, thick yarn, or tulle, to the top for his hair.
Light blue glitter
- Cinderella: Add silver accents or clear rhinestones to mimic her fancy gown. You could also add a black velvet ribbon around the neck of the ornament, just like Cindy’s iconic choker necklace.
- Genie: Use black, white, and pink to draw on his face. Use matching blue felt for the ears and a gold ring for his earring. Wrap gold ribbon around the neck of the ornament and black felt for his mini pony tail.
- Sadness: Use royal blue, black, white, and pink paint for her face. Then add her hair using blue yarn.
Mint or light jade glitter
- Heart of Te Fiti: Use a darker tone of mint or jade to paint the swirl design from the Heart of Te Fiti. You can do a simple swirl or go more elaborate like in Moana. You could also use glow-in-the-dark glitter for this!
- Jasmine: Add a gold ribbon around the middle with a turquoise gem in the middle, like her headband. Another option is to paint the top half with black, like her beautiful thick hair, and then add the ribbon.
- Madame Leota: You could also do white, glow in the dark glitter, or super pale blue.
- Maleficent: Paint most of the ornament black, leaving a geometric-like heart shaped space for the face. Use purple, yellow, and black to draw on her face. Then use felt to add her horns and add purple stripes with acrylic or puff paint. Alternatively, you can use paint for the strips on the ornament and stitch the stripes on with purple embroidery thread on the horns.
- Sally from Nightmare Before Christmas: Draw her face on with white and black acrylic paint, plus a touch of red for her lips. Add rusty red yarn for her hair.
Orange glitter
- Nemo: Use black and white paint for his face and orange and black felt for his ears and top fin.
- Miss Minutes: Use white and black acrylic paint for her face. Optionally add orange pipe cleaners for her arms and legs.
- Moana: Add an off white or tan crochet ribbon and white pom pom trim, like her skirt. Add a teal jewel like the Heart of Te Fiti or a faux hibiscus flower.
- Orange Bird: Use black, white, and yellow paint to add his face. Then use a faux leaf for the top of his head. Alternatively, you can add a daisy trim for the crown he sometimes has.
- Tigger: Use black, light yellow, and pink paint for his facial features. Use orange and light yellow felt for ears. Alternatively, you can use pink felt or a pom pom for his nose, instead of paint.
Pink glitter
- Aurora, aka Sleeping Beauty: Add a gold crown or blue accents in honor of the “make it pink / make it blue” scene between her fairy godmothers.
- Piglet: Use black paint to add his facial features. Then use a darker pink felt for his ears and nose (or use a matching pink paint or pom pom).
Purple glitter

- Boo in a monster costume from Monsters Inc: Use peach, black, and white to draw in her face poking through the opening of the costume. Then use white or very light grey yarn for the hair. Add pipe cleaners and googly eyes for the antennae-like eyes.
- Figment: Add orange horns and wings made from felt or cardstock.
- Haunted Mansion: Use black paint to draw the infamous purple-and-black print. Alternatively, you could use silver glitter.
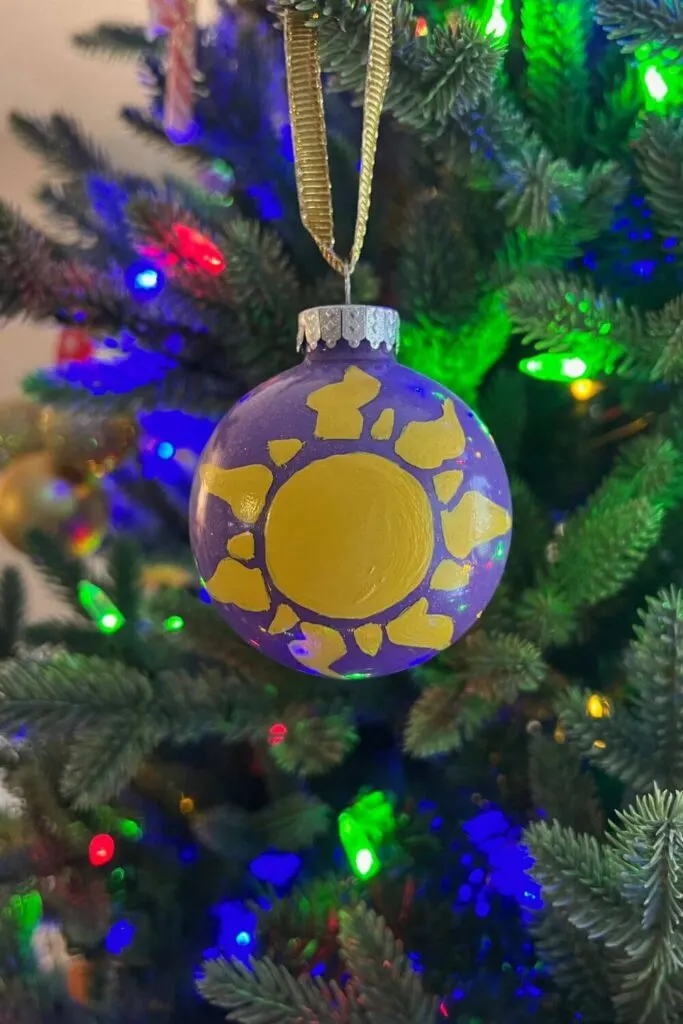
- Rapunzel/Tangled: Paint the iconic sun from the lanterns or attach a braid made from yellow yarn and tiny faux flowers.
- Slugma Slugma Kappa: Use silver paint to add the EEK logo from one of the Monsters University sororities.
- Ursula: Paint the bottom half of the ornament black, creating a sweetheart neckline for the bust. Use gold paint (dark and light tones) to draw a shell necklace. If you want to go further, use black and purple felt to add octopus legs and wrap some ripped up cotton around the neck for her hair.
Red glitter

- Lilo’s dress: Use white paint to add the leaf pattern from Lilo’s red Hawaiian dress.
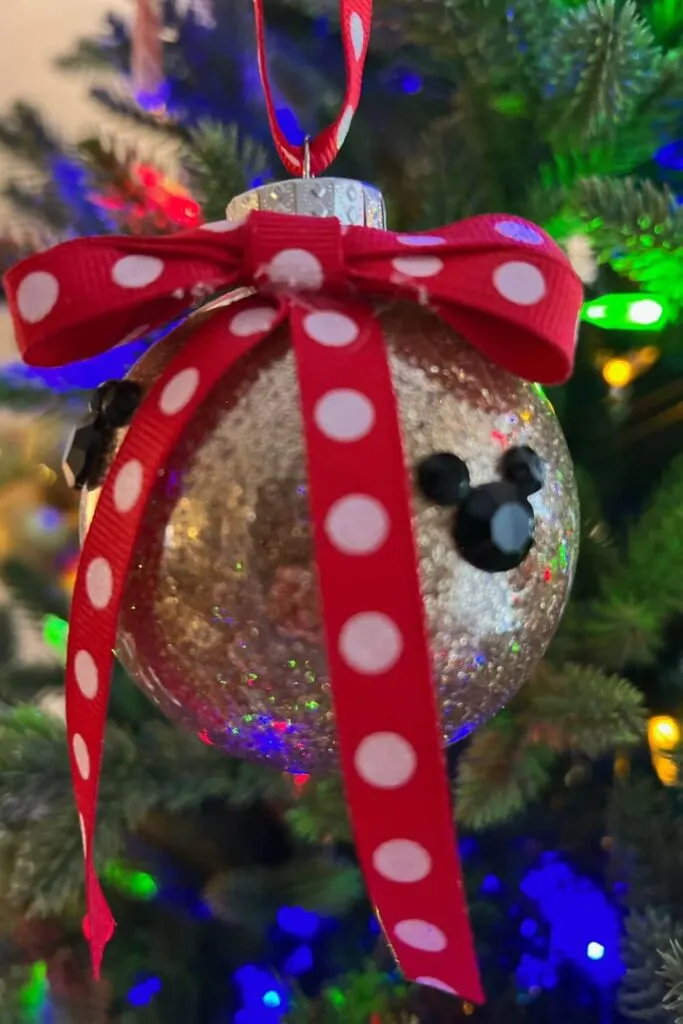
- Minnie Mouse: Add white polka dots with acrylic paint, flatback rhinestones, or pearls. A red-and-white polka dot bow and black pom pom ears could be a nice touch, too!
- Mushu: Use black, white, and dark red to draw on his facial features. Use gold pipe cleaners or stiff felt to add his mustache and turquoise felt for his horns.
- Snow White’s poison apple: Paint the poison face with lime green paint. Alternatively, you can use puff paint or add lime green glitter afterward, like in the photo above.
- Sorcerer Mickey: Add a blue ribbon with white or silver stars.
- Spiderman: Use black paint to draw on the grid pattern and a spider from his costume.
- The Incredibles: Use orange, black, and yellow paint to draw on the Incredibles logo from their costumes.
Turquoise glitter
- Elsa: Add snowflake stickers and rhinestones like Elsa’s cape. If you have a scrap of silver or light turquoise organza with snowflakes, you could even fashion a cape and attach it to the back of the neck!
- Sully: Paint purple splotches all around the ornament to mimic his fur.
White glitter

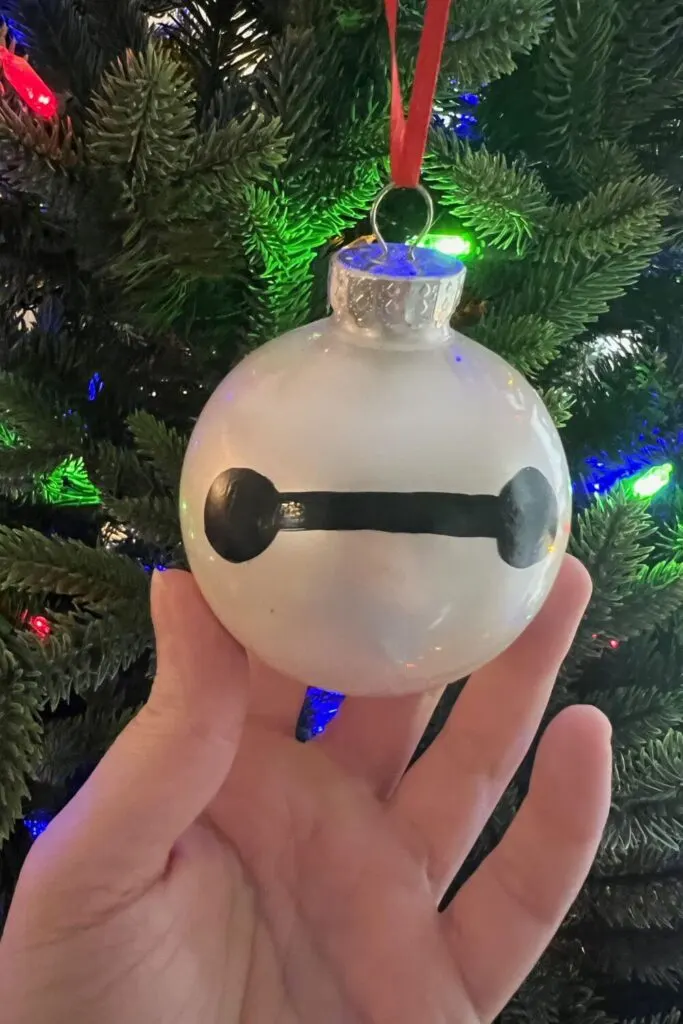
- Baymax: Draw Baymax’s eyes with black acrylic pain or a permanent marker. We replaced the hook with a red ribbon as a nod to his red super hero outfit, too.
- BB-8: Use black, orange, and grey or silver paint to draw on the details. If you want to go all out, use the technique from my DIY dollar store Mickey Mouse ornament tutorial to stack a small and large ornament vertically, just like BB-8!
- Buzz Lightyear: Use lime, purple, blue, dark green, and red to draw the detail from the chest part of his uniform.
- Chicken Little: Use black, lime green, and orange to paint his face. Use dark orange or red felt to add his “hair.”
- Cruella deVil (face): Paint on her face with black and red paint. Use black and white yarn for her hair.
- Daisy: Paint the top half of the ornament light purple. Add a pink bow.
- Donald: Paint the top half of the ornament royal blue. Use yellow paint to add a v-shape like his collar and add a tiny red bow at the peak.
- Jack Skellington: Draw his Skelly face with black acrylic paint or a sharpie.
- Marie: Use black, pink, and light blue to draw on her face and pink and white felt for her ears. Add a pink bow. You could also use white felt or faux fur to add a tuft of hair in the bow.
- Olaf: Use black and orange paint for his face and brown pipe cleaners for his hair.
- Oswald: Use black paint to draw in the rest of his face. Use black felt to add his tall ears.
- Pizza Planet box: Use red paint to add the Pizza Planet logo from the pizza box.
- Spaceship Earth: Use silver paint to draw vertical, horizontal, and diagonal lines that emulate the futuristic pattern.
Yellow glitter

- Flounder: Use a disc shaped ornament so it looks like he’s facing to the side. Use turquoise paint for his stripes an felt for the fins and tail.
- Joy from Inside Out: Use black, white, blue, and pink to draw her face. For her hair, either use blue paint or blue yarn with metallic threads. If you use paint, you might want to use metallic blue or add in silver highlights to mimic the shine in her hair.
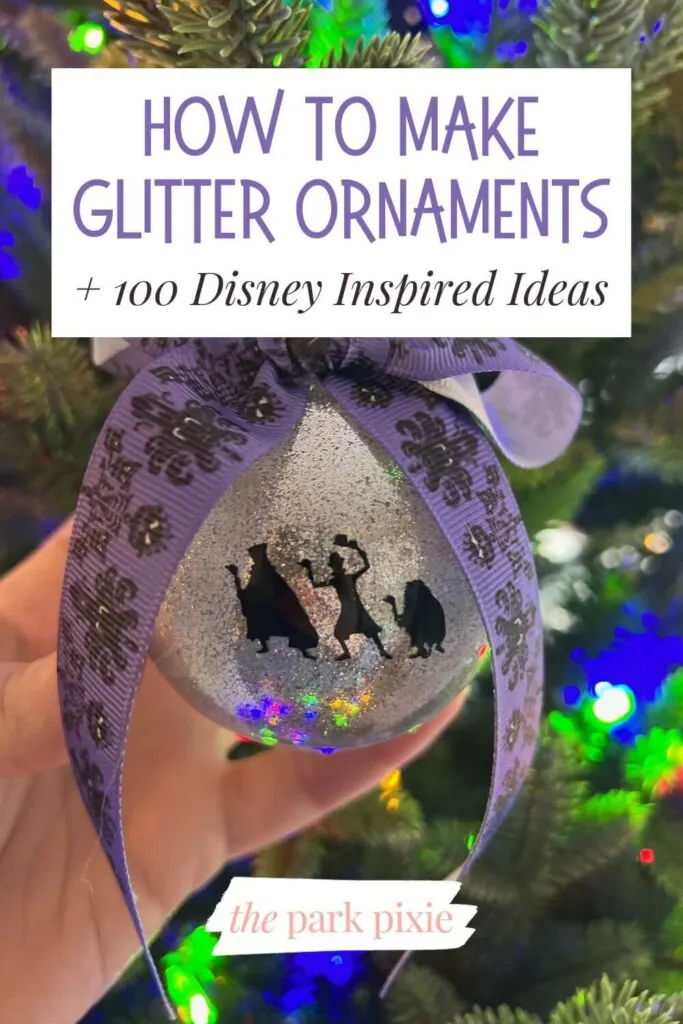
- Nightmare before Christmas silhouette: Paint the iconic silhouette scene from the DVD cover. Alternatively, at least paint the curly mountain peak!
- Olympus coin from Hercules: Use a disc ornament to emulate the shape of a coin. Then use brown and dark gold paint to draw the coin’s design.
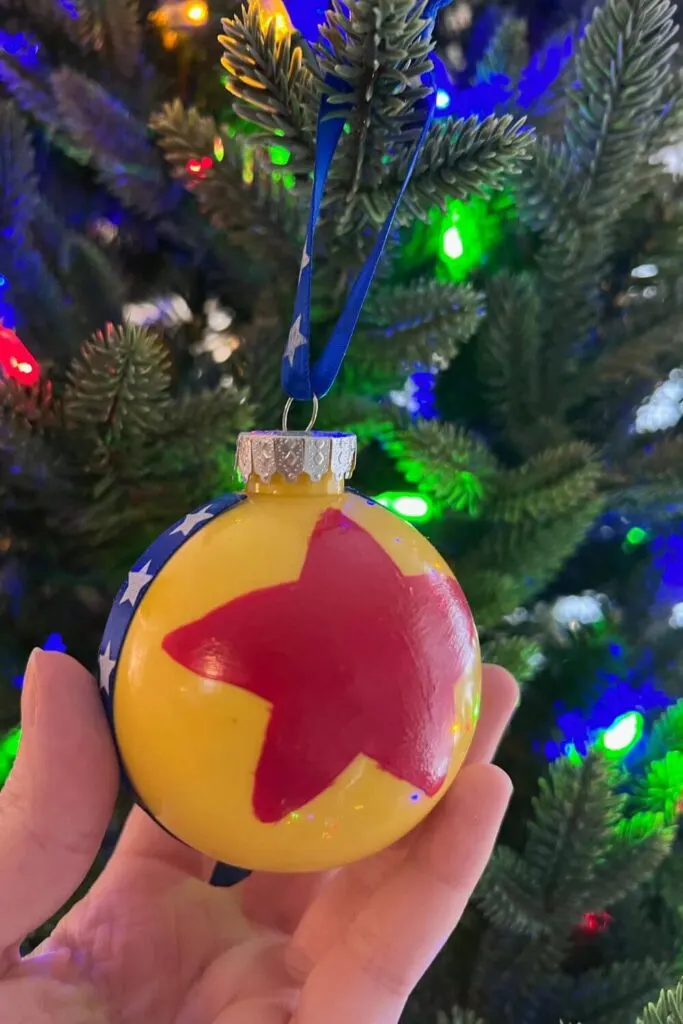
- Pixar ball: Paint a red star using acrylic paint and add a blue ribbon with white stars.
- Winnie the Pooh: Paint the bottom or top half red. If you paint the bottom, use yellow or gold felt or mini pom poms for ears. If you paint the top, use the felt or pom poms for feet. You could also write “Pooh” in black or yellow on the red part of the ornament.
- Woody: Use red paint to draw on the plaid pattern from his shirt. Alternatively, you could also paint the bottom half of the ornament blue, like his jeans.
Which characters did you make for your DIY glitter ornaments?
I hope my tutorial on how to make glitter ornaments and list of Disney-inspired ideas were helpful. I’m sure you’ll agree making these are super duper easy.
Decorating them might take more skill, but at the end of the day, have fun making these with your friends or family and try not to let your inner perfectionist take over.
I originally wanted to throw away my scary Cheshire Cat ornament and really struggled with the Tangled sun ornament pictured earlier in this post, but years later, they are two of my faves.
Have a lovely Christmas season and I hope you have tons of fun making these ornaments!


Need some Christmas gift ideas for a Disney lover? Check out these easily shoppable lists on Amazon curated by yours truly. Just add to cart & go!
About the author
Meg Frost is the creator of The Park Pixie, where she covers Disney World, Disney+, and Disney fandom.
She holds an M.A. in Journalism from Northeastern University and B.S. in Communication & American Studies from University of Miami in Florida.